Talk:User Interface: Difference between revisions
| Line 18: | Line 18: | ||
===6. Bottom Toolbar=== | ===6. Bottom Toolbar=== | ||
Here there are several menus that become accessible as you level up. | |||
===7. Minimap and Right Toolbar=== | ===7. Minimap and Right Toolbar=== | ||
Revision as of 00:52, 29 January 2015
User interface
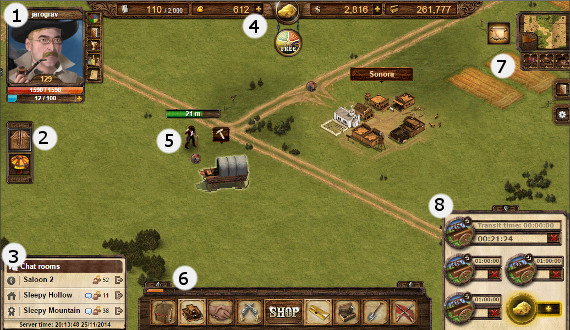
1. Player Avatar Area
In this area your player avatar is displayed which may be changed by clicking the image. Your level, health and energy points are also displayed here. You may also access your skills, questbook, achievements, ranking, and your daily tasks menu.
2. Left Toolbar
On the left side of your screen there is an icon to access the saloon. Throughout the year there may also be special events which are accessed from this area such as the travelling fair, valentine's event or the various tombola events which yield special items. Any notifications will also be displayed here such as friend requests and achievements.
3. Chat Rooms
Here you may access any chatrooms you are currently in. The town chat is marked with a house icon, the alliance chat is marked with a ribbon, and the saloon chat is marked by a compass. You may also have a whisper window marked with a '#' symbol as well as a fort window which will be marked with a flag.
4. Top Toolbar
Displayed at the top of your screen is your current amount of bonds, nuggets, cash on hand and banked cash. You may also purchase nuggets by clicking the nugget icon and access the bond shop by clicking on your current number of bonds.
5. The Map
In the center of your screen is you can see where your player is, queue jobs and do most actions in game.
6. Bottom Toolbar
Here there are several menus that become accessible as you level up.
7. Minimap and Right Toolbar
Here you can access the world map which is explained in detail below. There are also buttons which will allow you to place markers on the map, and the ability to center the map on your forts, town or character.
On the right is where you can access the settings menu as well as useful links such as the wiki, forums and support.
8. Job Queue
Potato
World Map
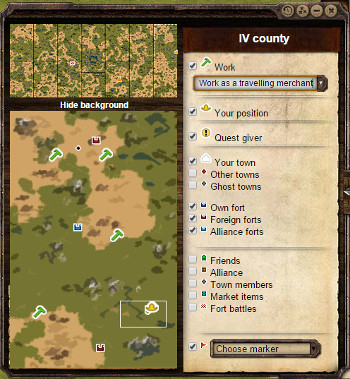
You can get to the world map when clicking on the smaller map image in the main user interface window.
The world map gives you a better overview of the surroundings. Your current sector is marked with a white frame. Your exact location is marked with a yellow hat. Your town is marked by a white pentagon, other towns with red dots, and quest givers with a black exclamation mark within a yellow circle. A full legend is available within the user interface.
With the selection box you can highlight specific jobs on the map. All job location for a selected job are marked by green hammers.
You can quickly move to a point on the map by clicking on it. Your current location frame moves to the new location.
The area on the world map that you are looking at right now is just a small part of the world. The whole world is 7 times as wide and twice as high with an additional central sector containing high level jobs, quest locations and a special fort. You can select any area by clicking it on the world map. Your current location is marked by dotted white line. By clicking on another area the local map changes to the new location.
Within the world map window there are options for overlays to show various forts, towns and individual players. You can also search for job locations and even place markers to easily pin a location.


