Job
Jobs are at the heart of the whole western economy, offering valuable experience, cash and products to players. These things allow for survival - and progress to be made in the Wild West. So, to be a success, you have to go out there and work hard!
It all will start with fixing spurs, then as you grow and be more skilled, you will be able to do farming along with some basic mining jobs. Every time you reach a new level, all the new jobs you unlocked will be revealed. When your each lvl 120, all the jobs will be open to you.
Read on to understand all the features of jobs
An overview
Currently, there are 127 jobs in the game. All the jobs are sorted in groups of 3 to 6, depending on their type. For instance, the “mining jobs” – silver mining, Mine sulfur, Mine lead, Dig for rare gemstones, Mine saltpeter and prospecting are all found in the same work area. You can find a particular job by using the minimap.
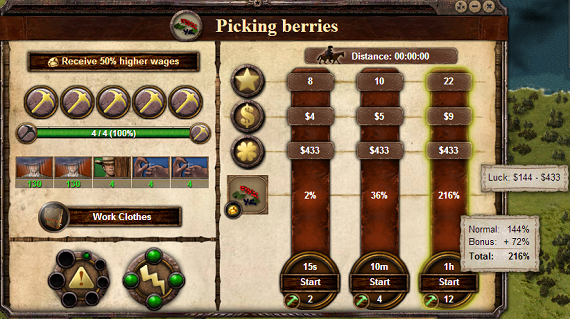
The above image shows a typical job page. The five pickaxes in the top left section of the page represent your labor points, showing how good you are in this particular job. The two large circles in the bottom represent danger and job motivation respectively. Above these circles you can click on Work Clothes button to display the best clothes for this job. The right side of the page shows the different times at which you can do the job – 15 seconds, 10 minutes and 1 hour. The rewards are shown in the horizontal bars. By order, they are experience, money, maximum value of a possible item drop and product drop rate.
Under the "start" button, beside the green hammer is the energy requirement which coincide with motivation consumed upon completion of that particular time slice. In addition, the distance to the job site is shown in the top-right corner of the page.
Extra information may be extracted by hovering the mouse over particular elements on the job screen.
Unlocking jobs
When you start out in the game, not all jobs are open for you to work at. To unlock a job you must fulfill either one of the two requirements:
- Achieve the required level
- Have the required labor points
For example, freeing slaves requires you to have 751 total labor points or for you to be level 99. To check how many labor points you are missing, hover over the job on the map and tool tip will display in red font the missing labor points.
In the early stages, some aspects of a job are locked. The 10 min and 1 hour work periods are unlocked at level 10 and 20 respectively.
Enhanced jobs
Enhanced jobs are jobs that are encircled with a silver or gold rim. These jobs are not visible on the minimap and the only way to find them is to expand all the job groups. Each day at 3-4 AM they are reset and randomly distributed on the map.
Silver enhanced jobs get a boost of 50% to experience, cash and product drop rate. Golden enhanced jobs receive a 100% boost. The bonus provided from the premium income bonus and the advent character bonus does compound with the increased cash received, however it does not compound with the increased product drop rate.
Cancelling work
It is always possible to cancel the work you are doing right now or jobs you have queued to be done later on. Just click on the X next to the job. The energy will be automatically refunded. If you cancel a job assignment while walking to the job site, you instantly jump back to the beginning point of your journey. If you cancel the 2nd job in your queue, the 3rd job is pushed forward. Cancelling a job in progress will not generate a report.
Labor points
Every job has 5 skill slots, the job represented above – Picking berries, requires 2 x toughness, hiding and 2 x fine motoring skills.
The skill points you have in each slot are added up to give the total labor points you have in the job. They are represented by the pickaxes, which can take the form of three colors 


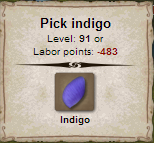
The green bar under the pickaxes represents the progress towards getting the next pickaxe. When you have all 5 at gold, the bar stays full. Hovering over this bar brings up a tool tip containing the total labor points you have for this job. To find out how many labor points a job requires, you should subtract the labor points shown in this tool tip and the labor points from the tool tip generated when hovering over the job icon on the map.
Example: ![]() -
-  = 591 labor points required for Pick indigo
To get to the silver level, you have to collect all 5 bronze axes. 5 silver pickaxes are needed to reach the golden level.
It must be noted that the pickaxes are simply a representation for how good you are in a job. The amount of cash, experience, maximum luck value and product drop rate are directly affected by labor points. This increase in rewards is great initially, especially while you do not have the required amount of labor points.
Here are a few cases where the pickaxes play a significant role:
- If you have bronze pickaxes, it means you’re relatively unqualified for the job at hand. The danger levels are typically high. As soon as you get the fifth bronze pickaxe, the danger goes down considerably.
- Five bronze pickaxes represent sufficient labor points for that job.
- Experience increases with additional labor points if you do not yet have 5 bronze pickaxes at which point it stops increasing and it represents the maximum experience for that job.
- Getting all five golden pickaxes in a job gives a bonus of 50% in finding the job product.
There are various ways of gaining extra labour points in a job
- Gear: click the ‘work clothes” button to find the best clothes in your inventory for the job. It is advisable to do research to find out about other pieces of clothing which can contribute to a greater increase in labor points. You can either buy them in the stores, travelling merchant or procure them over the market. Here is a complete list of items.
- Item sets: Some items are part of a set that provides skill point and/or labour points bonuses. Some sets give job-specific labour point bonuses. Here is a complete list of item sets.
- Work instructions: These can only be brought from the union pacific shop or gained from some quests. These items are usable and have attacked a number of uses.
- Crafted products: There are various crafted products that provide labour points. These products work exactly like work instructions.
- Seasonal usable products: It was possible to get some usable products from tombolas and seasonal holidays that boost the labour points when consumed.
Rewards
 Cash
Cash
Each job upon completion offers monetary reward. The cash received varies from job to job but provided that you have job motivation greater than 0% and you didn't pass out on the job, you will always receive cash.
The money you will earn is accurately represented in the bars on the job page – you will earn nothing more, nothing less than the amount specified when you started the job. When motivation drops, the amount of money you can get also drops. To increase the amount of money received, you can increase the labour points for that job or purchase Higher income premium. Adding more labour points increases the money but the formula used is not a linear function and the effect of extra labour points decreases with each additional point added.
 Experience
Each job upon completion offers experience reward. The experience received varies from job to job but provided that you have job motivation greater than 0% and you didn't pass out on the job, you will always receive experience.
Experience is increasing with additional labor points until you reach the required labour points for the job (5 bronze pickaxes). The only way to increase the experience further is to find enhanced jobs which are silver and gold encircled jobs randomly distributed on the map.
 Luck
Luck
Each job has the possibility of dropping an item. The formula that calculates the probability of a drop is unknown and secret. The Adventurer's bonus should increase this chance by 10%. The luck value displayed on the job screen represents the maximum value of the item. To find out the minimal value, hover over the luck value. In theory you have an unknown possibility of finding an item with purchasing value falling between the minimum and maximum luck value.
The luck varies from job to job, the most profitable jobs are considered to be Work as a traveling merchant and Grave robber. Irrespective of working time, the luck value is constant however longer working time has a better luck chance.
The luck value is increasing using a similar way as the cash, with additional labour points. Higher income premium affects the luck value as well as certain Item sets and recently introduced reward usable item like Lucky worker's clasp. However there is no way of crafting or buying such products.
 Product Drop rate
Each job offers one or 2 products but some jobs offer a unknown random product. The chance of dropping these products is displayed using a percentage value in the job screen. Each time slice has a different product drop rate, larger time slice favoring higher drop rates.
Product drop rate is increased from 1% by adding extra labour points. The highest product drop rate is achieved by reaching 5 golden pickaxes where it receives a bonus of 50%. Adding additional labour points will not affect the product drop rate.
Adventurer bonus and Higher income premium are the only additional enhancements that can further increase the drop rate. To see a break down of all the bonuses, hover with the cursor over the product drop rate.
 Danger
For all jobs there is an element of danger. Irrespective of working time, the risk of getting hurt is constant. The level of danger in all jobs is calculated by the labour points you hold in the job.
The injury chance is represented with a percentage, meaning that the chance of injury is straight forward a simple random number probability. The severity of the injury is a grey area and as of now we do not know how it is calculated, but it has a predictable pattern: low chance of injury usually represents a low damage and a high chance of injury higher or even very high damage. It is not possible to get knocked out in a single job with hull health. Adventurer bonus decreases injury chance by 10%.
You get hurt, relative to your health points, so while a person with 2000 health points can suffer a damage of 900 health points, a person with 14000 Hp can get a damage of 6500 health points. It all depends on the amount of labour points you have in the job.
The injury chance is different for various jobs and it is usually very grave for jobs that you have high negative labour points. Bringing the job's labour points to the required quantity usually greatly decreases the injury chance and it is further decreased with additional labour points.
 Motivation
Motivation directly affects the rewards you can get from work – the lower the motivation is, the lower the rewards. Motivation affect experience, money and luck chance. It doesn't affect injury chance or injury severity, luck value and product drop rate.
Motivation is updated after the report is generated and affect the following job only. However if you raise your motivation (either with motivation buffs or the daily motivation increase), the increase will affect the report.
The motivation is represented in the motivation circle by 4 green balls. Each ball represents 25% motivation. When calculating job rewards, only the following decrements are considered: 100%, 75%, 50%, 25% and 0%. If the current motivation is 47%, the rewards suffer a 50% malus because the closest higher decrement between the immediately next lower decrement and immediately next higher decrement is used.
The motivation malus is applied to all affected rewards in the same way. If the job X offers 130 experience and $95 with 100% motivation then at 50% motivation it offers 130*50%=65 experience and $95*50%=$47.5 rounded upwards to $48.
Each job decreases the motivation according to the work time selected:
- In a 15s job, motivation drops by 1%
- In a 10min job, motivation drops by 5%
- In a 1 hour job, motivation drops by 12%
Motivation does not replenish itself with time like health points and energy points. At 5AM the motivation for all jobs is restored to 100%.
There are certain buffs and crafted items which can be used to restore motivation during the day.
Job List
A list of all jobs can be found here.


