Fort Fighting For Dummies: Difference between revisions
m (→Signing Up) |
|||
| Line 66: | Line 66: | ||
[[File:Neutral_sign_pick.jpg|300px| | [[File:Neutral_sign_pick.jpg|300px|left]] This is the screen if your town isn't part of the attackers' nor the defenders' alliance or if you're townless. | ||
=== What will I need? === | === What will I need? === | ||
Revision as of 11:43, 1 October 2014
So here you are, you decided to join the amazing world of fort fighting. This guide will explain the basics that will help you go through your first fort battling steps.
Terminology
Crit: Critical hit, an ability only duellers have. A critical hit deducts an additional 10% off a fighter's maximum health points.
Blind: Used by a person blocking a sector or a tower. It’s the spot in that sector / tower with the minimum possible los on the opponent or that helps you get the least damage.
Ghost: An ability only adventurers have and makes them powerful blockers. Starting with the 2nd time they get hit in one round, they get a 25% chance (or 50% for premium) of not being hit at all. It’s not dodging. It’s more than that, it’s like they don’t exist.
Green: When both the fighters have set their swap correctly, the arrow between them turns green.
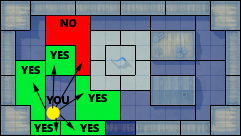
LOS: Acronym of Line Of Sight. Maybe the most important thing in a fort fight. It shows you the areas on the map that your character can shoot and get shot at. You can see your current LOS by hovering the mouse over you. All bright areas are your LOS. The greyed out areas are those that you cannot shoot at and cannot be shot from. If you move, your LOS will change.
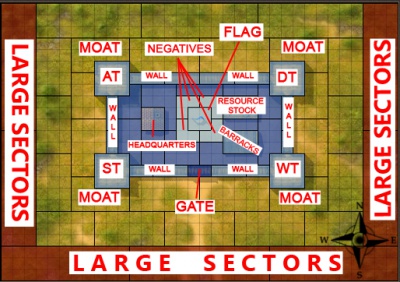
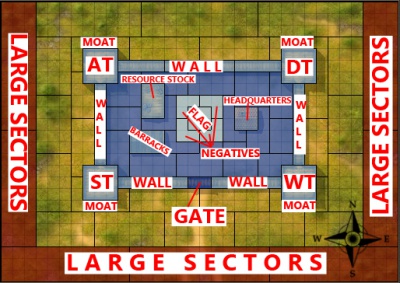
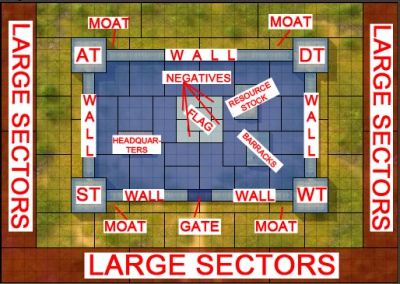
Moat: Sectors outside the fort, next to the towers. Blocking them usually prevents the enemy from moving faster and prepares the attacker to mount a tower or a wall.
Mount: Usually followed by the name of a tower, building or wall. When you are ordered to mount something, aim to move on it (only if you’re next to it).
Negatives: These are the areas that surround and contain the flag. Those L shaped sectors plus the square of the flag. The reason they are called like that is because they are the only sectors on the fort map that give negative bonus to the person standing on them. The flag area gives -20 on your attack and on your defence value. The L sectors surrounding it give -10 on the attack and on your defence value.
Swap: When someone is asking you to swap positions with him/her or if the leader asks you to do so. Green arrow confirms the swap, red arrow means one of the two players hasn’t set his character to swap.
Before you join
In order to take part in a fort fight, two things should always occur.
- Already signed up for the fort fight.
- Be at the fort when the battle starts.
Signing Up
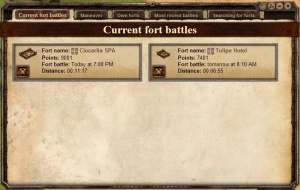
Step one: Click on the Fort overview button
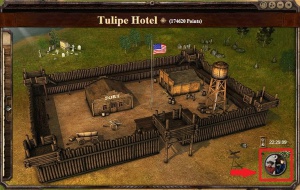
Step two: Click on the fort battle you want to join
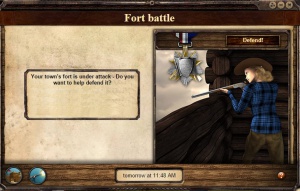
Step three: Click on the "To arms!" button
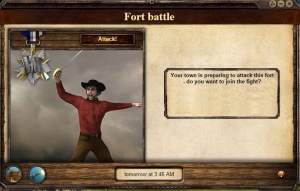
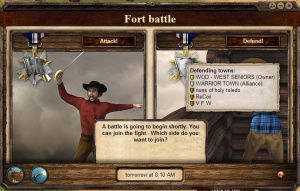
Step four: Sign up to the battle. If you hover over the "attack" or the "defend" image you will see which other towns have joined the attack or the defence respectively.
This is the screen if your town isn't part of the attackers' nor the defenders' alliance or if you're townless.
What will I need?
Clothes that boost the fort fighting skills. These are Stamina, Health Points (from now on we will just call it HP), Dodging, Hiding, Aim, Leadership. Depending on the fort fighting formula at the moment you are playing, some skills might be more important than the others. For example, in the version we're now playing, Aim and Dodging are not that important. Health is the King, Leadership gives you damage (it also helps a bit with aiming and dodging), Stamina and Hiding gives you resistance and help you aim and dodge better. The whole fort fighting formula can be found here.
Hint: As a beginner, the wisest thing to do is go for HP clothing because you will probably make movement mistakes. Since you don’t want those inexperience accidents to get you killed just in one round, having as much HP as you can get might save you. Furthermore, in many worlds giving out ranks is done on a descending HP base; this means that those with the highest HP get priority in getting ranked while lower ones either have to wait or they don’t make it in the fort fight at all. So the more HP you have, the higher your chances are to get a rank.
You will also need a left hand gun. A fort fighting gun. Here is a list of the best guns per level and per class.
| Stone | 50-100 (80) | 1 | 1 | 1 |
| Brittle Bow | 50 - 130 (90) | 5 | 2 | 1 |
| Bow | 70-150 (110) | 10 | 7 | 4 |
| Precise Bow | 100-188 (144) | 13 | 10 | 7 |
| Precise Crossbow | 120-192 (156) | 23 | 20 | 17 |
| Precise Harquebus | 112-232 (172) | 33 | 30 | 27 |
| Precise Musket | 126-266 (196) | 43 | 40 | 37 |
| Precise Coach Gun | 168-268 (218) | 53 | 50 | 47 |
| Precise Percussion Rifle | 172-292 (232) | 63 | 60 | 57 |
| Precise Breech - Loader | 200-296 (248) | 73 | 70 | 67 |
| Precise Winchester | 200-312 (256) | 78 | 75 | 72 |
| Modified Precise Musket | 206-346 (276) | 95 | 92 | 89 |
| Modified Precise Breech Loader | 231-288 (259,50) | 103 | 100 | 97 |
| Modified Precise Percussion Rifle | 265-290 (277,50) | 120 | 117 | 114 |
| Precise Single Shot Rifle | 200-400 (300) | 139 | 136 | 133 |
| Precise Trade Musket | 225-325 (275) | 144 | 141 | 138 |
| Modified Precise Winchester | 280-280 (280) | 147 | 144 | 141 |
Sidenote: There are named guns that are superior to those in the list above. They are not mentioned though on purpose. Many named guns are better for specific builds than others; as soon as you get into the fort fighting mechanics, you will find your way and pick the named gun that suits you the most. Furthermore, guns with a wide range, e.g. 1-400 are not included because they are not as precise as other guns even if their average shot is higher.
After you join - Before the fort fight
One of the first things to do is to check the battle chat topic; usually this will guide you on where to start and/or where to set your character. If there is no topic, ask someone else in the chat for help/advice on where to set.
How to set your character and your target
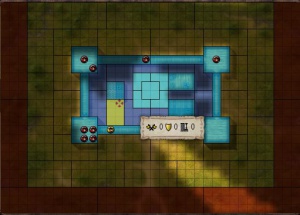
Click once on the desired spot you want to start on the map. You will see a yellow mark that indicates your character. This is where you will be placed once the battle starts (unless someone else starts at the same spot with you, but ignore this part for now).
Click on the desired target spot. A red cross will appear. This is where your character will aim to move to unless you change your target when the battle starts.
There's only a limited amount of players that can take part in a fort fightso you want to make sure you’ll get in.<spoiler text="Click here for details">{| border="1" style="margin: auto"
|
|
|
|- |Small |50 |42 |- |Medium |100 |84 |- |Large |140 |120 |}</spoiler>This can be reassured by having a rank. Ranks are given out by a General or a Captain that’s in charge of this responsibility before the battle begins (usually it starts maximum 1 hour before the fight).
General rules of ranking:
- Wait to ask for a rank until the ranking procedure starts
- Always ask only once for a rank. There is no need to spam the whole chat over and over again just to get a rank. Usually this ends up in having the exact opposite result.
- No caps please unless you are the person ranking. No need to shout at the rest.
- Using the word “please” shows manners too and makes the ranker’s job more pleasant. Don’t forget after all, he’s the one usually stressing about getting you guys and gals in the battle.
- No spamming - Your chit chat is making it difficult for the ranker to see who has asked for a rank.
- No offensive language.
- No begging.
- If you are going afk/offline during the fort fight, notify the ranker in advance.
Question: Why are there different ranks?
A rank determines the order in which people shoot and move. More about the order of the events can be found here.
Let the battle begin!
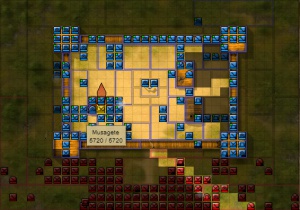
The Map
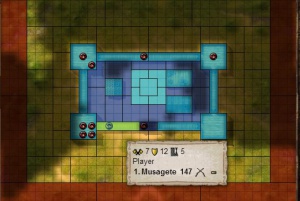
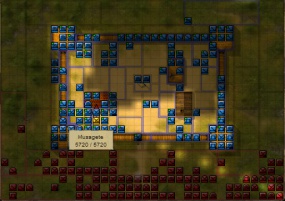
Congratulations! You’re taking part in the battle! Before we start explaining how to move, let’s have a look at the map.
Explanation:
AT stands for Adventurers Tower
DT stands for Duellers Tower
ST stands for Soldiers Tower
WT stands for Workers Tower
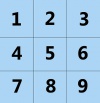
You will also hear people saying "AT1" or "DT2" and so on. This is to indicate a specific spot on a tower. The numbers go as follows and they are the same for all four towers:
Movement
Now let’s go to what we are here for. The battle just started, we know where everything is located on the map, time to fight.
First thing to do: Right click with your mouse on the fort fighting screen, select Quality and set it to low. Doing this will make LOS more clear to see.
Every proper fort fight has a leader. You will identify that person in many ways. Usually it's a person writing in capital and bold letters. Most of the time they use a coloured text too. He or she is an experienced player that has done this before. Always follow the leader’s orders. Fort fighting is a team game, so it is crucial that we are all moving as one.
| The general idea is we move as a team, sharing the fire we take while trying to hurt the opponents. This is why having a good LOS is important and working as a team is even more important. |
Hint: During the battle you might get some orders that you don’t understand. Don’t be ashamed to ask in the chat for clarifications. From my experience, there is always someone that wants to help new players and will end up talking to you in a whisper, helping you throughout the battle.
In order to move, click on your character and then click on an open spot in a neighbouring sector or in yours. At the beginning of the next round, your character will move to that spot or the closest one available. If the sector you are aiming at is full, you won’t move until a spot empties. Always remember that other fort fighters will probably aim the same spot as you; who will get that spot is determined by the following a hierarchy as described here. Therefore, if you are low in the movement hierarchy, try aiming spots that are a bit less "popular" so as to be able to move as you wish.
Caution: You cannot move diagonally.
Movement hint:
Aim one sector at the time. The game’s Artificial Intelligence (AI) isn’t that smart (yet) and doesn’t take into consideration the existence of enemies in the fort battle. The way it is designed, it is trying to get you to the spot you aimed at as fast as possible. Therefore, aiming 2 sectors away might get you in a pretty bad position with tons of enemies shooting at you and most probably ending up getting you killed. Always aim one sector at the time unless the leader orders you differently.
Aiming/Shooting
Aim and targeting is automatic. You cannot choose who you want to shoot, you cannot aim past the people in front. You may only shoot at the closest target in your line of sight. What you can do though is aim at a specific sector (that is adjacent to yours); this will make you shoot at the people in that sector.
- One shot can’t take more than 1/3 of the maximum HP of a player. By maximum HP we mean maximum amount of health a player has when the battle starts. For example if the battle starts and you have 5400/7000 hp, your maximum HP is 7000.
To make it simple, always keep the following in mind:
1. The defenders shoot.
2. The defenders move.
3. The attackers shoot.
4. The attackers move.
So when you are attacking, always remember you will be shot at the beginning of the next round. So try not to be too much exposed at the enemy if you're low on health.
| Fort fighting is something that you are improving at as you gain more experience (like most things in life to be honest). Therefore, don’t be disappointed after a bad fort fight. Also don't be disappointed if you miss a lot or you don't dodge well. Always keep in mind that the attack and the defence chances are based on probabilities and sometimes we don't get lucky. Be persistent and you will get there. After all, we were all noobs before we started (some of us still are and will always be). |
After the fort fight
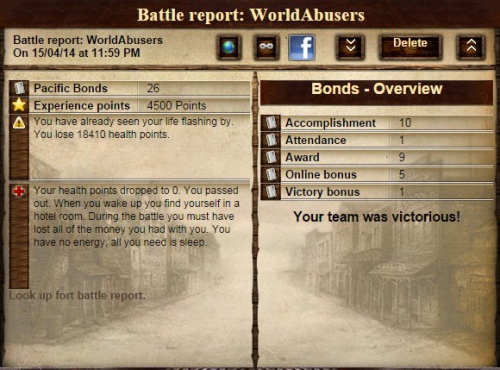
After the fort fight is over, you will get a report with the results.
If you passed out during the fight, you will be send back to your town's hotel and the game will automatically set 8 hours of sleep for you (if you don't have a town you will remain at the same location). If you die during a fort fight you don't lose your inventory or your banked cash; you do lose though the cash you're carrying on you and your energy drops to 0. If you survive, you will remain at the same location. Your health will match the health you had when the last round of the fort fight ended.
FAQ
Q1: What the heck! How did I end up on the wall? I didn't aim there!
When you end up in a sector you haven't aimed at, this means that you probably set your character to move 2 sectors away, letting the game's AI decide the best route for you. The best route for the game is the shortest way but surely not the safest one.
Q2: Why am I not taking part in the fort fight? I have a rank!
Blame the ranker! Apparently the person giving out ranks ranked more than he should (overranking). Therefore people with a higher rank than you (Generals > Captains > Privates) or higher leadership got in first and you didn't. You can find more details on the priority of the events here.
Q3: Why am I starting at this spot? I didn't place my character there!
Ok there are two explanations for this one. Either someone with higher hierarchy sat on you (stacked you) and you were pushed to the closest available spot or you forgot to place your character on the map before the fort fight.
Q4: Do I have to be awake to take part in the fort fight as a defender or can I sleep at the barracks?
You can set to sleep in the barracks. If you make it in the fort fight, the sleep will be cancelled though and after the fort fight you will be just sitting there. If you don't make it in though, you'll continue sleeping unless the fort is lost.
Got any further questions? Please contact me (Musagete) and I can help you and add them to this manual.


